I had some trouble getting structs to work in my Arduino project. This is how I fixed my code.
My project's ultimate goal is to replace the innards of a fibre optic lamp with a custom lightshow, but it's also a chance to play around with low-level circuitry & coding1. So far, I've designed and prototyped a hardware LED controller that's driven by an Arduino. The Arduino pumps out binary to the controller; this determines which LEDs light up.
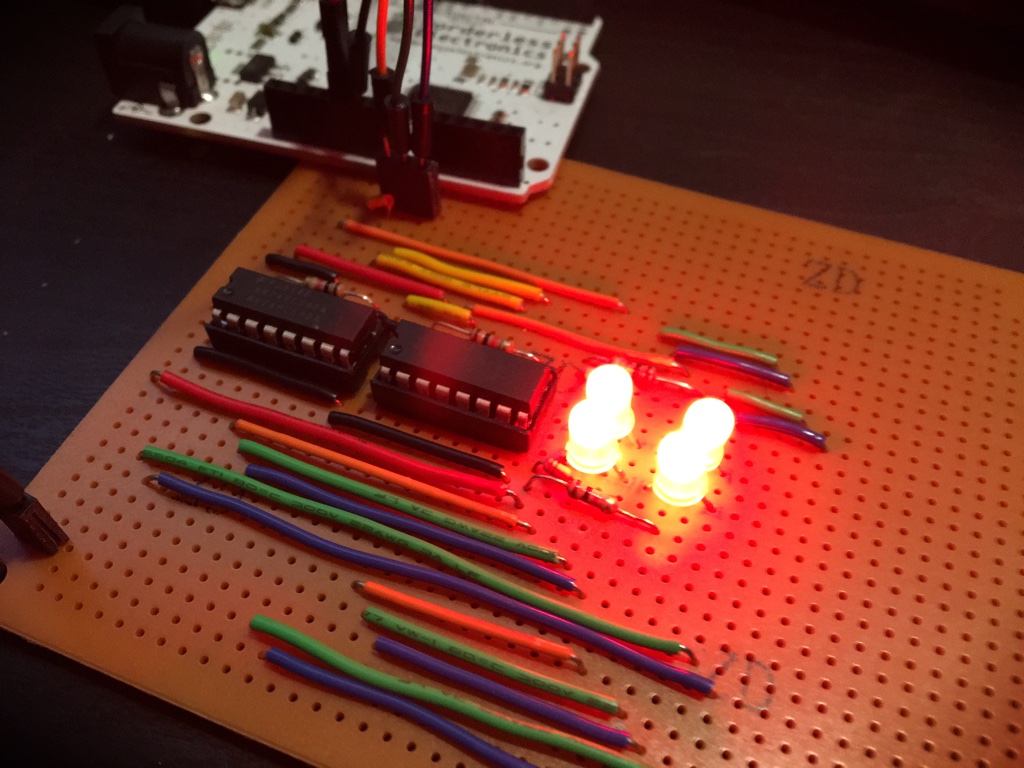
Each of the 4 LEDs you see on the board is an RGB LED, meaning it's actually a package of individual red, green, and blue LEDs. My old code used numbers to choose which colour to display, so it had function signatures like these:
void turnOnLED(int colour, int led);
void bounceColour(int colour); // A 'chase' pattern across all 4 LEDs.
void fadeBetween(int startingColour, int endingColour, int duration); // Fade between two colours in `duration` milliseconds
That's fine for pure colours, but it doesn't allow for compound colours (mixes of red, green, and blue) because the controller can only turn LEDs on and off. If you want purple, for instance, you turn on the red LED for a few milliseconds, then turn it off & turn blue on for a few milliseconds. Repeat this over & over and persistence of vision does the rest.
I could have used an integer for each colour, but using a struct keeps all the information in a single variable. I also created some constants for common colours using my new struct:
struct Colour {
    byte red;
    byte green;
    byte blue;
};

const Colour C_RED = {1, 0, 0};
const Colour C_BLUE = {1, 0, 1};
const Colour C_PURPLE = {1, 0, 2}; // 2 parts blue to 1 part red.
const Colour C_COLOURS[] = {C_RED, C_BLUE, C_PURPLE};
Next, I updated my functions to take a Colour parameter instead of an int. I also changed my parameters so they were pointers to the Colour instead; I couldn't get my code to compile without this.
void turnOnLED(Colour* colour, int led);
void bounceColour(Colour* colour);
void fadeBetween(Colour* start, Colour* ending, int duration);
The -> operator is used to access the values from the Colour* arguments2:
void turnOnLED(Colour* colour, int led) {
    float total_time = 3500;
    float total_colours = colour->red + colour->green + colour->blue;
    float timeRed = total_time * (colour->red / total_colours);
    float timeGreen = total_time * (colour->green / total_colours);
    float timeBlue = total_time * (colour->blue / total_colours);

    // Rest of function that rapidly changes between red, green, and blue removed for brevity.
}
Now the functions take a pointer to a Colour, I can change the calls to them to pass the address of a colour (using the & operator):
void loop() {
    bounceColour(&C_RED);
    bounceColour(&C_COLOURS[random(0, 3)]);
}
The final piece of the puzzle is to work around some limitations in the Arduino IDE. The IDE preprocesses your code before passing it to the compiler. One of its transformations is to generate function prototypes for your code – but it doesn't get it right for functions that use custom types, so you have to define them youself. The docs recommend you add it to a header file, but if you've only got a few then you can add them directly to your sketch. I added my function signatures below the struct Colour definition.
To summarise:
- Declare your struct at the top of your file.
- Update or override your functions so they take a pointer to your new struct. Remember to use the
&operator when calling the new functions! - Add function prototypes immediately after your struct definition for functions that take your struct as a parameter (or return the struct).
- Use the
->operator to access the properties in your struct.
An aside on understanding pointers
Pointers are a straightforward concept – "a variable that holds the address of a value, rather than holding the value directly," – but are really challenging to fully understand and use.
One trick that helped me was pronouncing the * in variable declarations as 'a pointer to'3, and pronouncing & as "the address of". So turnOnLED(Colour* colour, int led) is read aloud as "a function turn-on-LED that takes a pointer to a Colour and an integer". Or, consider the call to bounceColour here:
void loop() {
    bounceColour(&C_RED);
}
I say this as "call bounce-colour, and pass it the address of C_RED."
Another thing that helped was grasping that * means different things in declarations & usage. In declarations, * means "this is a pointer":
int* avocado; // Define a variable 'avocado' containing a pointer to an integer
But when using a variables, * means dereference: follow this pointer and use the thing it's pointing at.
// Define a couple of numbers, and a pointer to an integer
int x = 3;
int y = 8;
int* num;
num = &x; // "num equals the address of x"; it's now a pointer to x.
*num = *num + 4; // "Follow num and use the value of what it's pointing to, add 5 to it, and then store it back in the slot pointed to by num."
After this code, x is equal to 7, and *num is equal to 7 – they're both ways to access the same section of memory. std::cout << num will print the memory address (eg. "0x1234ABCD"); std::cout << *num will print the value "7".
This difference is why I write declarations as int* foo (and not int *foo). Keeping the asterisk next to the type emphasises that it's part of the type, not part of the name. foo is a pointer to an integer; there's no variable named *foo in this program. I find it a useful reminder (as does Bjarne Stroustrup), but it can trip you up if you declare multiple variables on one line:
int* bell, book, candle; // Declares one pointer to an int, and 2 ints
int *blinky, inky, clyde; // Also declares one pointer to an int, and 2 ints

int* bell, *book, *candle; // 3 pointers, but looks messy
int *blinky, *inky, *clyde; // Also 3 pointers, with a consistent style
Personally, I think declaring multiple variables on one line is best avoided. It's hard to tell if it's clever code or a subtle bug with declarations like that. But like all code formatting choices, it's down to individual taste.
-
There are much better ways to make your own lighting projects if you don't have an interest in the low-level details. Neopixels, for instance, are reasonably priced, easier to extend, and easier to code for. ↩
-
->is used because the argument is a pointer. If we were passing aColourdirectly, we'd use the.operator instead (eg.colour.red). ↩ -
I preferred the word 'reference' instead of 'pointer' when I was learning C, but C++ has a references feature that makes that confusing now. ↩