I switched to OSX as my primary operating system around a year ago, after a lifetime of running Linux on the desktop. Using Ubuntu on a Macbook Pro is surprisingly straightforward and didn't require any low-level finagling, but it did come with some annoyances; annoyances that led me to try OSX as my primary OS. I kept the dual boot, but over time I wanted more disk space available to OSX. I had to piece the process together every time; here's what worked for me.
Step 0: take a good backup.
Editing partitions carries a risk of losing all your data. Backup everything! In both operating systems! These steps worked for me, but might not work for you. And while we're talking precautions: choose a time when you don't have important deadlines, meetings, or other computer-centric tasks.
Step 1: make space on the drive.
You need free space for your OSX partition to expand into. The disk utility in OSX is limited and can't resize Linux partitions, but GParted can. I downloaded Ubuntu and made a bootable USB key. Plug it in, then reboot while holding down the
Once in Linux, my process was:
- Clear some space on the Linux partition beforehand, then shrink it in GParted.
- Move the now-smaller partition to the end of the drive.
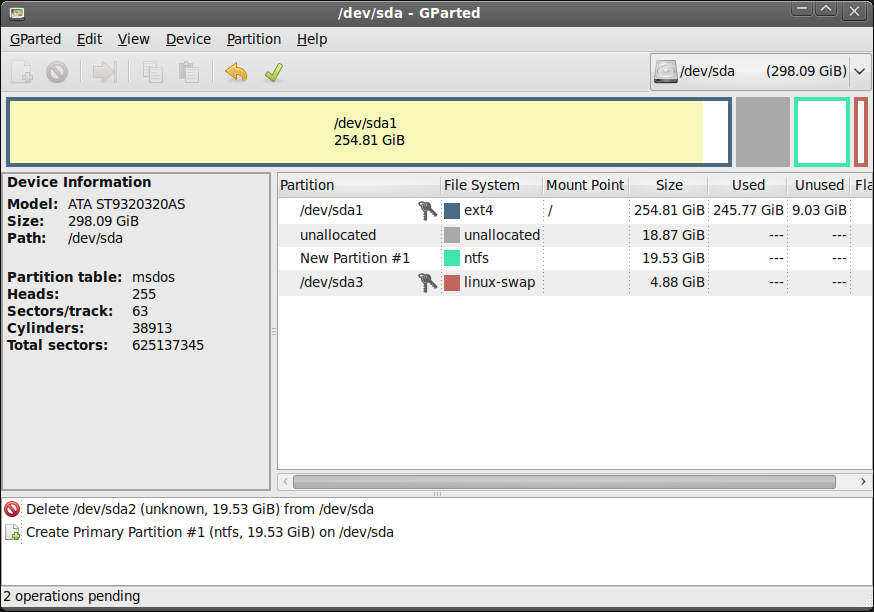
- Move any other partitions (eg. OS X recovery partitions) towards the end of the drive, so there's unallocated space after the partition you want to expand. Something like this1:
GParted will let you queue up these changes and try to apply them all in one go, but that gave me some (apparently harmless) error messages. I'd recommend making the changes one at a time.
Step 2: reboot into OSX and turn off CoreStorage.
OSX uses a volume manager called CoreStorage that acts as an intermediary between the operating system and the hardware. It's a requirement for FileVault encryption, but we can't expand drives while it's enabled. First, let's see all the CoreStorage volumes using diskutil cs list on the terminal:
CoreStorage logical volume groups (2 found)
|
+-- Logical Volume Group UUID 9559695B-73C6-40ED-B6EB-F3DE8767058A
|   =========================================================
|   Name:         Macintosh HD
|   Status:       Online
|   Size:         249222377472 B (249.2 GB)
|   Free Space:   0 B (0 B)
|   |
|   +-< Physical Volume UUID A76BF102-C0CF-41C4-9D88-27F8BB9A180E
|   |   ----------------------------------------------------
|   |   Index:    0
|   |   Disk:     disk0s2
|   |   Status:   Online
|   |   Size:     249222377472 B (249.2 GB)
|   |
|   +-> Logical Volume Family UUID EDA455C5-3FD0-444E-B00C-F9F8F2EF88EC
|       ----------------------------------------------------------
|       Encryption Type:         AES-XTS
|       Encryption Status:       Unlocked
|       Conversion Status:       Complete
|       High Level Queries:      Fully Secure
|       |                        Passphrase Required
|       |                        Accepts New Users
|       |                        Has Visible Users
|       |                        Has Volume Key
|       |
|       +-> Logical Volume UUID 4F3C168A-F0BB-40B6-B3FF-CE94D38506AD
|           ---------------------------------------------------
|           Disk:                  disk1
|           Status:                Online
|           Size (Total):          248873222144 B (248.9 GB)
|           Revertible:            Yes (unlock and decryption required)
|           Revert Status:         Reboot required
|           LV Name:               Macintosh HD
|           Volume Name:           Macintosh HD
|           Content Hint:          Apple_HFS
The most nested entry is the logical volume with a UUID of 4F3C168A-F0BB-40B6-B3FF-CE94D38506AD. Copy that UUID and use it in diskutil cs revert <UUID>:
diskutil cs revert 4F3C168A-F0BB-40B6-B3FF-CE94D38506AD
Reverting back to a regular volume takes some time, but you can check on the progress by running diskutil cs list until it shows as complete.
Step 3: Reboot, then expand the partition.
Your drive is no longer encrypted and doesn't use CoreStorage any more, so you can use Apple's Disk Utility to expand it. The 'partition' section has a pie chart with handles you can drag. Something like this:

Step 4: Reboot again, then convert your drive back to a CoreStorage partition.
Run diskutil list to see all the partitions in your Mac. The one you want to convert is probably called "Macintosh HD". Let's re-enable CoreStorage:
diskutil cs convert "Macintosh HD"
Step 5: Reboot, then re-enable FileVault.
You can re-enable this from System Preferences → Security & Privacy → FileVault. This will also prompt you to reboot, for the last time.
Getting out of trouble
Everything broke with this final reboot. On startup, the Apple logo & a progress bar appeared before being replaced with a "no entry" logo (🚫) around ⅔ of the way through. This is how a Mac says "I found something that looked like OSX, but didn't contain a valid system folder."
The short-term fix was to reboot while holding the
-
This screenshot isn't from my system, so don't worry about the lack of OSX partitions here. It's just to show the unallocated space after the first partition on the drive. ↩