Blog

Exploring weird maths with code

Sometimes, while reading an innocuous-seeming article, I stumble across an aside that makes me sit bolt upright and mutter something incredulous. Asides like this one:

A counterintuitive property of coin-tossing: If Alice tosses a coin until she sees a head followed by a tail, and Bob tosses a coin until he sees two heads in a row, then on average, Alice will require four tosses while Bob will require six tosses (try this at home!), even though head-tail and head-head have an equal chance of appearing after two coin tosses.

Wired

This was a surprise! The four possible outcomes of two tosses are equally likely, so it seems weird that a heads-tails outcome would take longer to reach than a heads-heads. Weird enough to try it at home – at least by programming. Let's write some Ruby and see if we get the same result. (I recommend opening irb and exploring these examples for yourself if you want to fully understand them.)

Checking some assumptions

First of all, let's agree to toss a coin by picking a random symbol from an array1:

def coin_toss
  %i(heads tails).sample #=> :heads or :tails. 
end

And let's confirm that this is close enough to 50/50, by counting the result of tossing a coin 100,000 times:

results = {heads: 0, tails: 0}
1000000.times { results[coin_toss] += 1 }

puts "After 100000 tosses we saw #{results[:heads]} heads and #{results[:tails]} tails."

.sample chooses an element at random, so the result will be a little different each time. I ran this program 10 times, and got these results:

After 100000 tosses we saw 50131 heads and 49869 tails.
After 100000 tosses we saw 49845 heads and 50155 tails.
After 100000 tosses we saw 50094 heads and 49906 tails.
After 100000 tosses we saw 49672 heads and 50328 tails.
After 100000 tosses we saw 50062 heads and 49938 tails.
After 100000 tosses we saw 50046 heads and 49954 tails.
After 100000 tosses we saw 50003 heads and 49997 tails.
After 100000 tosses we saw 50094 heads and 49906 tails.
After 100000 tosses we saw 50124 heads and 49876 tails.
After 100000 tosses we saw 49838 heads and 50162 tails.

I think these results look OK, but the next thing I tried was busting out some statistics and checking the standard deviation. You can think of it as a measure of how closely-clustered our results are – we'd expect to get a low standard deviation if .sample is fair. Calculating the standard deviation is a little bit complicated, so I used the descriptive_statistics gem to make it easier. Let's calculate the standard deviation of the number of heads in each run:

require 'descriptive_statistics'
[50131, 49845, 50094, 49672, 50062, 50046, 50003, 50094, 50124, 49838].standard_deviation #=> 146.014

But is 146.014 low or not? I have no idea! This is where my statistics knowledge runs out. For now, let's presume our eyeballs are correct and our coin tosses are fair.

Back to the question

If we can toss a coin fairly, we can return to our original question: how many tosses, on average, does it take to reach a given combination?

We'll need a target combination, we need to toss at least twice, and we want to toss until we hit the target:

target = [:heads, :heads]
tosses = [coin_toss, coin_toss]

until tosses.last(2) == target
  tosses << coin_toss
end

I ran this in irb and I got [:tails, :tails, :heads, :tails, :heads, :heads]. It works! Let's turn this into a method so we can reuse it:

def tosses_until(target)
  tosses = [coin_toss, coin_toss]
  until tosses.last(2) == target
    tosses << coin_toss
  end
  tosses
end

Running the experiment repeatedly will make our result more reliable. If something weird happens once it could be a fluke, but you can't fluke something thousands of times. We could use the .times method again, and build up an array of results like we built the array of tosses:

experiments = []
100000.times { experiments << tosses_until([:heads, :heads]) }

Or we can make this shorter by using Ruby's .map method. .map applies a method to every element in a list. It's normally used to modify an existing list:

["cat", "dog", "avocado"].map { |t| t.upcase } #=> ["CAT", "DOG", "AVOCADO"]
(1..4).map { |n| n * 3 } #=> [3, 6, 9, 12]

But it doesn't matter if we throw the original elements away instead. You can try this in the console, but beware! It's going to print out all 100,000 results.

experiments = (0..100000).map { tosses_until([:heads, :heads]) }

It's not really relevant to our experiment, but I wondered what the shortest and longest sequence until our target was. You might expect that we can use experiments.min and experiments.max to find out:

experiments.min #=> [:heads, :heads]
experiments.min.length #=> 2
experiments.max #=> [:tails, :tails, :tails, :tails, :tails, :tails, :tails, :tails, :tails, :tails, :tails, :tails, :tails, :tails, :tails, :heads, :tails, :heads, :tails, :heads, :heads]
experiments.max.length #=> 21

But that's not quite right2 for the maximum case. It looks right, though – a handy reminder that verifying data by eye can lead you astray. Instead, we need to use .max_by to explicitly look at the length of the array:

experiments.max_by { |e| e.length }

This pattern – calling a method on the value passed into the block – is common, so Ruby provides a shorthand for this:

experiments.max_by(&:length) #=> [:heads, :tails, :tails, :tails, :heads, :tails, :tails, :tails, :heads, :tails, :tails, :tails, :tails, :tails, :heads, :tails, :tails, :heads, :tails, :heads, :tails, :tails, :tails, :heads, :tails, :tails, :heads, :tails, :tails, :heads, :tails, :tails, :heads, :tails, :tails, :heads, :tails, :heads, :tails, :tails, :heads, :tails, :tails, :heads, :tails, :tails, :heads, :tails, :tails, :heads, :tails, :tails, :tails, :tails, :tails, :tails, :tails, :tails, :tails, :heads, :heads]
experiments.max_by(&:length).length #=> 61

Let's put all this together in one place, and add some output about our results:

def coin_toss
  %i(heads tails).sample #=> :heads or :tails. 
end

def tosses_until(target)
  tosses = [coin_toss, coin_toss]
  until tosses.last(2) == target
    tosses << coin_toss
  end
  tosses
end

experiments = (0..100000).map { tosses_until([:heads, :heads]) }
average_toss_count = experiments.reduce(0) { |sum, n| sum + n.length } / experiments.length.to_f # We'll talk about this line below.

puts "Our shortest sequence was #{experiments.min_by(&:length)}"
puts "Our longest sequence was #{experiments.max_by(&:length)}"
puts "On average, we had to toss #{average_toss_count} times before (heads, heads) came up."

.reduce is a close cousin of .map. .map does something to every element in a list; .reduce takes two elements from a list and boils them down into one. It does that repeatedly to produce a final value:

[1, 2].reduce { |a, b| a + b } #=> 3
[1, 2, 3].reduce { |a, b| a + b } #=> 6: [1, 2, 3] → [3, 3] → 6.
[1, 2, 3, 4].reduce { |a, b| a + b } #=> 10: [1, 2, 3, 4] → [3, 3, 4] → [6, 4] → 10.

You can also give .reduce a starting value, which is what we did in our program:

[1, 2].reduce(10) { |sum, a| sum + a } #=> 13: 10 + 1 = 11 then 11 + 2 = 13.
[1, 2, 3].reduce(10) { |total, a| total + (a * 2) } #=> 22.

We started our toss count at 0, then added the length of each run to that total. Finally, we divided it by the total number of runs to get an average. The .to_f on the end converts the length to a floating point number, because we'd like to see the decimal places in the result.

9 / 2 #=> 4; really "4 remainder 1", but Ruby throws the remainder away
9 / 2.to_f #=> 4.5

Simplifying our code

This works, but is more complicated than it needs to be. Our goal was to find out how many tosses, on average, it takes to hit our target – we don't care about the sequence of tosses to get there. Let's change our tosses_until method to return the number of tosses instead of the sequence itself:

def tosses_until(target)
  tosses = [coin_toss, coin_toss]
  until tosses.last(2) == target
    tosses << coin_toss
  end
  tosses.length
end

This lets us make our trial run code simpler. We could build an array of the sequence counts, then add it up:

experiments = (0..100000).map { tosses_until([:heads, :heads]) }
average_toss_count = experiments.reduce(&:+) / experiments.length.to_f

We could skip the array entirely, and just maintain a total:

total_experiments = 100000
total_tosses = 0
total_experiments.times { total_tosses += tosses_until([:heads, :heads]) }
average_toss_count = total_tosses / total_experiments.to_f

Or we could use reduce again:

total_experiments = 100000
total_tosses = (0..total_experiments).reduce(0) { |sum, _| tosses_until([:heads, heads]) }
average_toss_count = total_tosses / total_experiments.to_f

The "best" version is a matter of taste, but personally I prefer the first version. It uses more memory, but that doesn't matter in experiments like these. It's the shortest code, we can find the longest run of tosses, and it's reasonably clear how it works once you get your head around .reduce.

Let's put the first version into a method that runs the experiment and reports the outcome for a given target:

def coin_toss
  %i(heads tails).sample
end

def tosses_until(target)
  tosses = [coin_toss, coin_toss]
  until tosses.last(2) == target
    tosses << coin_toss
  end
  tosses.length
end

def average_toss_count(target, num_experiments)
  experiments = (0..num_experiments).map { tosses_until(target) }
  average_toss_count = experiments.reduce(&:+) / experiments.length.to_f

  # sprintf formats the average so it prints to two decimal places only.
  puts "On average, we had to toss #{sprintf('%.2f', average_toss_count)} times before #{target.inspect} came up. Our longest run was #{experiments.max} tosses."
end

The other cases

Now we have all the building blocks to run the experiment for each of the four possible outcomes:

targets = [[:heads, :heads], [:heads, :tails], [:tails, :heads], [:tails, :tails]]
targets.each { |target| average_toss_count(target, 100000) }

Which produces:

On average, we had to toss 5.98 times before [:heads, :heads] came up. Our longest run was 52 tosses.
On average, we had to toss 4.00 times before [:heads, :tails] came up. Our longest run was 22 tosses.
On average, we had to toss 3.99 times before [:tails, :heads] came up. Our longest run was 20 tosses.
On average, we had to toss 6.00 times before [:tails, :tails] came up. Our longest run was 55 tosses.

Sure enough, it takes longer on average to hit [:heads, :heads] or [:tails, :tails] than [:heads, :tails] or [:tails, :heads], even though each outcome has an equal probability. It's still weird, but now I'm satisfied it's true.

Why does this happen?

Let's go back to Alice and Bob, who are targeting [:heads, :tails] and [:heads, :heads] respectively:

Player Target
Alice H T
Bob H H

Let's presume they both win their first toss – they both get a result they're looking for:

Player Target Result 1
Alice H T H
Bob H H H

Then, presume they lose their second toss:

Player Target Result 1 Result 2
Alice H T H H
Bob H H H T

There's now a major difference between the two players: Alice can hit her target on toss 3, but Bob can't until toss 4. Bob must start over after losing on toss 2; Alice's loss can be part of a win if she gets a tails on turn 3.

Exercises

If you'd like to explore this some more, here's some suggestions for things to try:

  1. Change the program so it runs the experiment a million times instead of 100,000.
  2. If we toss three coins, there's eight possible outcomes. How long does it take, on average, to hit each combination? Are there some sequences that take longer than others?
  3. We left our proof of a fair coin toss at "Yeah, that looks OK." Can you do better? How would you satisfy yourself that it's producing fair results?

  1. %i() is Ruby shorthand that generates an array of symbols. %i(foo bar baz) means the same as [:foo, :bar, :baz].  ↩

  2. But why doesn't this work? When we call .min, Ruby uses the <=> comparison operator to find the smallest value in the list. experiments is an array of arrays; <=> for arrays calls <=> on each of the elements of the list in turn until it finds a difference. In this case, our list elements are symbols. Symbols get converted to strings before comparison, and "heads" < "tails" because "h" < "t". So the upshot of this is that experiments.max returns the result with the longest initial streak of tails.

    Yes, I had to look this up in the documentation.  ↩

The EU Referendum: A Retrospective

I have tried for days to write about the referendum, but I keep getting overwhelmed by the immensity of it. Will we actually leave, or prevaricate forever? Can we negotiate reasonable trade deals, or will the EU make an example out of us? Will companies still open offices in the UK now we're no longer a gateway to Europe? Will Scotland become independent? What happens next in Ireland? Will our most deprived regions keep their funding? Will workers' rights be protected? Any one of these would be Pandora's box; we have opened many at once.

All of these issues are important, and all of these are beyond my control. They're also beyond my foresight: I have no idea what happens next. The stock market is suffering and the pound is at a thirty year low. These falls came from the decision to leave, but the fluctuation comes from the uncertainty. Uncertainty is the UK's greatest national resource now. We can certainly export that to the world.

A collage of anti-EU, anti-migrant front pages from UK newspapers.
Nothing says tolerance, compassion, and decency like calling people "Ethnics". Collage via @gameoldgirl.

Everyone promptly found out that the "leave" campaign was a Potemkin village, but its shoddy foundations were laid over the previous decades. The tabloid press constantly pumped out anti-EU & anti-immigrant froth, and nobody found a way to combat it effectively. Politicians found they could use these fears to their advantage, so why try to dispel them? Besides, it would invite the wrath of the press.

Without this backdrop – a nation flooded by freeloaders, powerless to prevent pointless meddling from Brussels – the UK would never vote to leave. It would have sounded preposterous. It was our government alone that failed to invest in the NHS, to build houses and schools, to make sure our post-industrial regions weren't dependent on grants, and allowed employment to become more precarious. Nothing to do with Europe. But it's no surprise that the people on the losing end of rising inequality would vote against the status quo.

As a user, given that I have a time machine...

I've grappled with two questions since Thursday night: "What should I1 have done differently?" and "What should I1 do now?". I'd kept my own counsel in previous elections but I spoke up a little this time. Some of that was amongst friends, but I also made a small website that laid out the benefits of European co-operation. I tried to back up all my claims, but my goal was to change people's feelings – not their minds. I wanted undecided people to see this long list and think "Wow, I never realised that the EU had a part in all this". People in the UK think of the EU as faceless, ineffectual, meddling bureaucrats who force legislation upon us; I hoped to replace that with some affection.

The site was a small success. It reached a couple of thousand people, and sparked some discussion showing it reached folk who weren't voting "remain" already. But I can't shake the feeling that my aim was off. Older people are more likely to vote, and more likely to vote "leave" – but they're harder to reach through the internet, and I don't have a voice in traditional media. People outside of large cities were more likely to vote "leave" – but they're harder to reach as my social circle is very urban. What could I have done differently to reach those groups? What medium should I have used? Would a different message have resonated more?

This campaign seriously impressed me. It's so simple, but appeals directly to the viewer's sense of identity. Just three words and a picture of Churchill speak volumes about persevering through tough times and standing with our neighbours.

Or is this the wrong question? Instead of asking how to reach a different audience, perhaps it's better to convince my audience they need to vote. My gut says that's a harder problem – people have been trying to motivate the younger generation to participate in politics unsuccessfully for years. Transforming online activism into real-world action is Herculean. I don't know what I can do as an individual, but Facebook's "I voted" feature is the strongest encouragement I've seen online.

What do we do now?

I doubt we'll see a second referendum. We'd need to negotiate a new deal with the EU – one different enough to merit putting it to the vote again. But Europe wants us out and doesn't need to negotiate with a gun to its head. We already had many exceptions to EU rules but voted to leave anyway. So Europe has no motivation to offer us a deal, and no pro-EU politician will want to risk a second "leave" outcome. We might hope for a stalemate – the UK never invoking Article 50, the EU not finding a way to force us out – but I expect some combination of economic uncertainty & European resentment will result in Britain leaving the EU.

Journalists and politicians will try to identify the effects of leaving, but conclusive evidence will be scarce. You can't see the corporate headquarters that gets built in France instead, nor can you see the uncreated jobs from a lack of economic growth. Businesses don't fail for one reason alone. Infrastructure takes at least a decade to become obviously dated; too slow to recognise and attribute.

Individuals can't change the UK's situation, but we can make our communities better. I have four concrete suggestions:

  • Stand up for others when you see abuse and prejudice.
  • Talk with your friends and neighbours about your beliefs. Don't proselytise; just listen to what they say, and gently try to move their opinions a little. Be compassionate and polite. You're trying to show people that there's a huge range of perspectives in the world, and to dispel myths & fears.
  • Lobby your MP to focus on their constituency instead of party politics. MPs need to support job security and job creation. They need to protect worker's rights and the social safety net. Let them know you expect this of them.
  • Hold the people who got us into this mess to account. They convinced us to leave, but don't want the responsibility of figuring out the details or standing by their pledges. And don't forget the disgusting parts either.

I also have an idea for another project. Something that makes it easier for people to engage with the politics that affects them, not the Westminster soap opera. I don't know if it will see the light of day, but I'm trying to use my anxiety about the future to propel it forward. It might not help after all, but anything's better than just looking on in horror.


  1. "I" really means "we": "what should an individual citizen, acting in their country's best interest, have done differently?"  ↩

How to Expand an OSX FileVault partition on El Capitan

I switched to OSX as my primary operating system around a year ago, after a lifetime of running Linux on the desktop. Using Ubuntu on a Macbook Pro is surprisingly straightforward and didn't require any low-level finagling, but it did come with some annoyances; annoyances that led me to try OSX as my primary OS. I kept the dual boot, but over time I wanted more disk space available to OSX. I had to piece the process together every time; here's what worked for me.

Step 0: take a good backup.

Editing partitions carries a risk of losing all your data. Backup everything! In both operating systems! These steps worked for me, but might not work for you. And while we're talking precautions: choose a time when you don't have important deadlines, meetings, or other computer-centric tasks.

Step 1: make space on the drive.

You need free space for your OSX partition to expand into. The disk utility in OSX is limited and can't resize Linux partitions, but GParted can. I downloaded Ubuntu and made a bootable USB key. Plug it in, then reboot while holding down the option ⌥ key. You can then choose a device to boot from.

Once in Linux, my process was:

  1. Clear some space on the Linux partition beforehand, then shrink it in GParted.
  2. Move the now-smaller partition to the end of the drive.
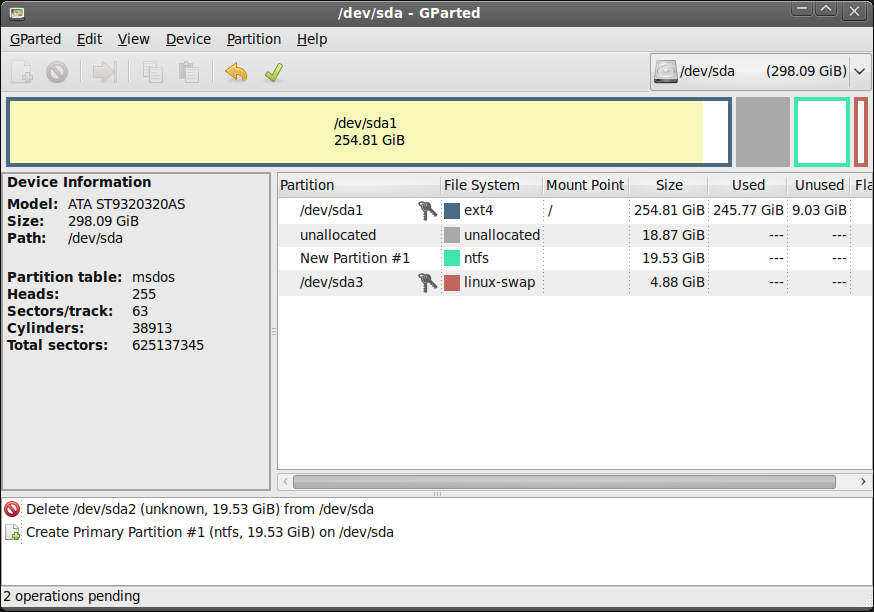
  3. Move any other partitions (eg. OS X recovery partitions) towards the end of the drive, so there's unallocated space after the partition you want to expand. Something like this1:
A screenshot of gparted, showing some unallocated space.

GParted will let you queue up these changes and try to apply them all in one go, but that gave me some (apparently harmless) error messages. I'd recommend making the changes one at a time.

Step 2: reboot into OSX and turn off CoreStorage.

OSX uses a volume manager called CoreStorage that acts as an intermediary between the operating system and the hardware. It's a requirement for FileVault encryption, but we can't expand drives while it's enabled. First, let's see all the CoreStorage volumes using diskutil cs list on the terminal:

CoreStorage logical volume groups (2 found)
|
+-- Logical Volume Group UUID 9559695B-73C6-40ED-B6EB-F3DE8767058A
|   =========================================================
|   Name:         Macintosh HD
|   Status:       Online
|   Size:         249222377472 B (249.2 GB)
|   Free Space:   0 B (0 B)
|   |
|   +-< Physical Volume UUID A76BF102-C0CF-41C4-9D88-27F8BB9A180E
|   |   ----------------------------------------------------
|   |   Index:    0
|   |   Disk:     disk0s2
|   |   Status:   Online
|   |   Size:     249222377472 B (249.2 GB)
|   |
|   +-> Logical Volume Family UUID EDA455C5-3FD0-444E-B00C-F9F8F2EF88EC
|       ----------------------------------------------------------
|       Encryption Type:         AES-XTS
|       Encryption Status:       Unlocked
|       Conversion Status:       Complete
|       High Level Queries:      Fully Secure
|       |                        Passphrase Required
|       |                        Accepts New Users
|       |                        Has Visible Users
|       |                        Has Volume Key
|       |
|       +-> Logical Volume UUID 4F3C168A-F0BB-40B6-B3FF-CE94D38506AD
|           ---------------------------------------------------
|           Disk:                  disk1
|           Status:                Online
|           Size (Total):          248873222144 B (248.9 GB)
|           Revertible:            Yes (unlock and decryption required)
|           Revert Status:         Reboot required
|           LV Name:               Macintosh HD
|           Volume Name:           Macintosh HD
|           Content Hint:          Apple_HFS

The most nested entry is the logical volume with a UUID of 4F3C168A-F0BB-40B6-B3FF-CE94D38506AD. Copy that UUID and use it in diskutil cs revert <UUID>:

diskutil cs revert 4F3C168A-F0BB-40B6-B3FF-CE94D38506AD

Reverting back to a regular volume takes some time, but you can check on the progress by running diskutil cs list until it shows as complete.

Step 3: Reboot, then expand the partition.

Your drive is no longer encrypted and doesn't use CoreStorage any more, so you can use Apple's Disk Utility to expand it. The 'partition' section has a pie chart with handles you can drag. Something like this:

A screenshot of Apple's disk utility, showing the pie chart with handles.

Step 4: Reboot again, then convert your drive back to a CoreStorage partition.

Run diskutil list to see all the partitions in your Mac. The one you want to convert is probably called "Macintosh HD". Let's re-enable CoreStorage:

diskutil cs convert "Macintosh HD"

Step 5: Reboot, then re-enable FileVault.

You can re-enable this from System Preferences → Security & Privacy → FileVault. This will also prompt you to reboot, for the last time.

Getting out of trouble

Everything broke with this final reboot. On startup, the Apple logo & a progress bar appeared before being replaced with a "no entry" logo (🚫) around ⅔ of the way through. This is how a Mac says "I found something that looked like OSX, but didn't contain a valid system folder."

The short-term fix was to reboot while holding the option ⌥ key. There was only one option ("Macintosh HD") in the list, which booted fine. The permanent fix was to use "System Preferences" → "Startup disks" and ensure that "Macintosh HD" was selected.


  1. This screenshot isn't from my system, so don't worry about the lack of OSX partitions here. It's just to show the unallocated space after the first partition on the drive.  ↩

Using structs in Arduino projects

I had some trouble getting structs to work in my Arduino project. This is how I fixed my code.

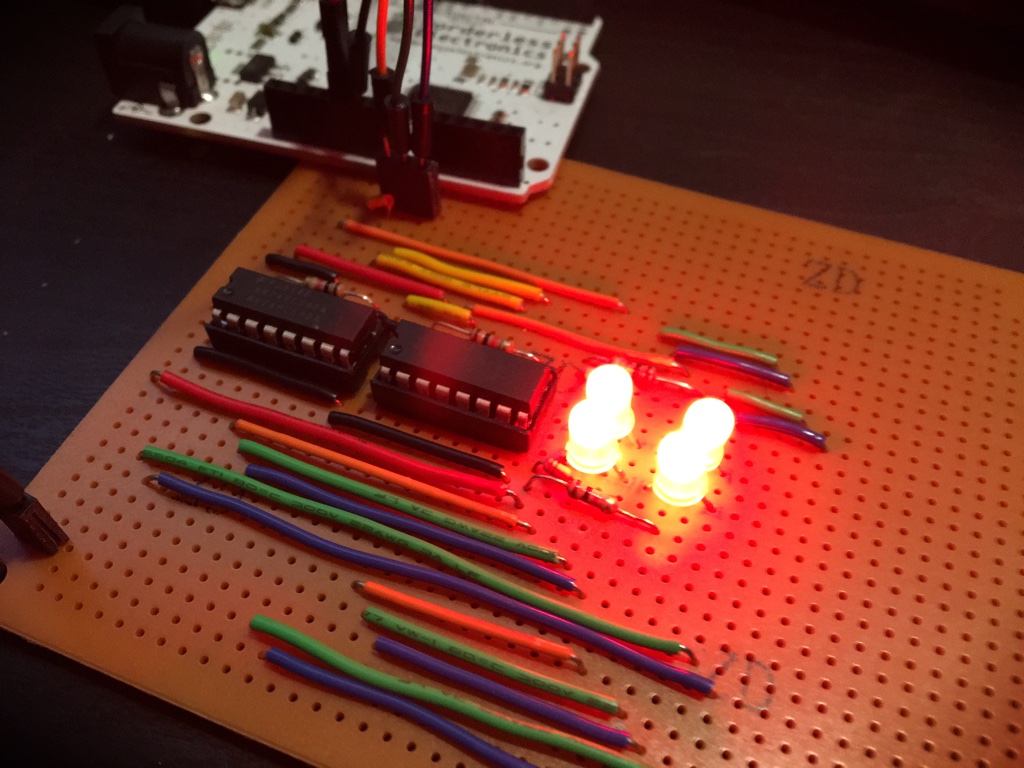
My project's ultimate goal is to replace the innards of a fibre optic lamp with a custom lightshow, but it's also a chance to play around with low-level circuitry & coding1. So far, I've designed and prototyped a hardware LED controller that's driven by an Arduino. The Arduino pumps out binary to the controller; this determines which LEDs light up.

A close-up of the circuit board

Each of the 4 LEDs you see on the board is an RGB LED, meaning it's actually a package of individual red, green, and blue LEDs. My old code used numbers to choose which colour to display, so it had function signatures like these:

void turnOnLED(int colour, int led);
void bounceColour(int colour); // A 'chase' pattern across all 4 LEDs.
void fadeBetween(int startingColour, int endingColour, int duration); // Fade between two colours in `duration` milliseconds

That's fine for pure colours, but it doesn't allow for compound colours (mixes of red, green, and blue) because the controller can only turn LEDs on and off. If you want purple, for instance, you turn on the red LED for a few milliseconds, then turn it off & turn blue on for a few milliseconds. Repeat this over & over and persistence of vision does the rest.

I could have used an integer for each colour, but using a struct keeps all the information in a single variable. I also created some constants for common colours using my new struct:

struct Colour {
    byte red;
    byte green;
    byte blue;
};

const Colour C_RED = {1, 0, 0};
const Colour C_BLUE = {1, 0, 1};
const Colour C_PURPLE = {1, 0, 2}; // 2 parts blue to 1 part red.
const Colour C_COLOURS[] = {C_RED, C_BLUE, C_PURPLE};

Next, I updated my functions to take a Colour parameter instead of an int. I also changed my parameters so they were pointers to the Colour instead; I couldn't get my code to compile without this.

void turnOnLED(Colour* colour, int led);
void bounceColour(Colour* colour);
void fadeBetween(Colour* start, Colour* ending, int duration);

The -> operator is used to access the values from the Colour* arguments2:

void turnOnLED(Colour* colour, int led) {
    float total_time = 3500;
    float total_colours = colour->red + colour->green + colour->blue;
    float timeRed = total_time * (colour->red / total_colours);
    float timeGreen = total_time * (colour->green / total_colours);
    float timeBlue = total_time * (colour->blue / total_colours);

    // Rest of function that rapidly changes between red, green, and blue removed for brevity.
}

Now the functions take a pointer to a Colour, I can change the calls to them to pass the address of a colour (using the & operator):

void loop() {
    bounceColour(&C_RED);
    bounceColour(&C_COLOURS[random(0, 3)]);
}

The final piece of the puzzle is to work around some limitations in the Arduino IDE. The IDE preprocesses your code before passing it to the compiler. One of its transformations is to generate function prototypes for your code – but it doesn't get it right for functions that use custom types, so you have to define them youself. The docs recommend you add it to a header file, but if you've only got a few then you can add them directly to your sketch. I added my function signatures below the struct Colour definition.

To summarise:

  1. Declare your struct at the top of your file.
  2. Update or override your functions so they take a pointer to your new struct. Remember to use the & operator when calling the new functions!
  3. Add function prototypes immediately after your struct definition for functions that take your struct as a parameter (or return the struct).
  4. Use the -> operator to access the properties in your struct.

An aside on understanding pointers

Pointers are a straightforward concept – "a variable that holds the address of a value, rather than holding the value directly," – but are really challenging to fully understand and use.

One trick that helped me was pronouncing the * in variable declarations as 'a pointer to'3, and pronouncing & as "the address of". So turnOnLED(Colour* colour, int led) is read aloud as "a function turn-on-LED that takes a pointer to a Colour and an integer". Or, consider the call to bounceColour here:

void loop() {
    bounceColour(&C_RED);
}

I say this as "call bounce-colour, and pass it the address of C_RED."

Another thing that helped was grasping that * means different things in declarations & usage. In declarations, * means "this is a pointer":

int* avocado; // Define a variable 'avocado' containing a pointer to an integer

But when using a variables, * means dereference: follow this pointer and use the thing it's pointing at.

// Define a couple of numbers, and a pointer to an integer
int x = 3;
int y = 8;
int* num;
num = &x; // "num equals the address of x"; it's now a pointer to x.
*num = *num + 4; // "Follow num and use the value of what it's pointing to, add 5 to it, and then store it back in the slot pointed to by num."

After this code, x is equal to 7, and *num is equal to 7 – they're both ways to access the same section of memory. std::cout << num will print the memory address (eg. "0x1234ABCD"); std::cout << *num will print the value "7".

This difference is why I write declarations as int* foo (and not int *foo). Keeping the asterisk next to the type emphasises that it's part of the type, not part of the name. foo is a pointer to an integer; there's no variable named *foo in this program. I find it a useful reminder (as does Bjarne Stroustrup), but it can trip you up if you declare multiple variables on one line:

int* bell, book, candle; // Declares one pointer to an int, and 2 ints
int *blinky, inky, clyde; // Also declares one pointer to an int, and 2 ints

int* bell, *book, *candle; // 3 pointers, but looks messy
int *blinky, *inky, *clyde; // Also 3 pointers, with a consistent style

Personally, I think declaring multiple variables on one line is best avoided. It's hard to tell if it's clever code or a subtle bug with declarations like that. But like all code formatting choices, it's down to individual taste.


  1. There are much better ways to make your own lighting projects if you don't have an interest in the low-level details. Neopixels, for instance, are reasonably priced, easier to extend, and easier to code for.  ↩

  2. -> is used because the argument is a pointer. If we were passing a Colour directly, we'd use the . operator instead (eg. colour.red).  ↩

  3. I preferred the word 'reference' instead of 'pointer' when I was learning C, but C++ has a references feature that makes that confusing now.  ↩